EFE Rebuild project.. updated july 2010..
so.. despite not having updated the GSX1100.com-site for nearly a year I have actually been quite busy working on the EFE..
it all started when I first took the bike out again at the beginning of the year and found it was running pretty bad.. cylinder no.2 didn't seem very eager to play along with the others at lower revs.. a wet plug pointed my suspicions to a faulty ignition so I decided to try some different coils and fitted the gray Dyna coils I had on the shelf for use on the GSX1100-project.. I also fitted the Dyna2000 of my GSX1100 when a spark test shpwed things still were not fixed with the coils alone.. Taylor Spiro leads completed this end (regular copper core leads not recommended with Dyna2000 ignition systems)
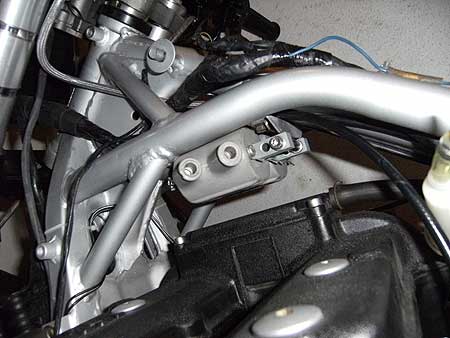
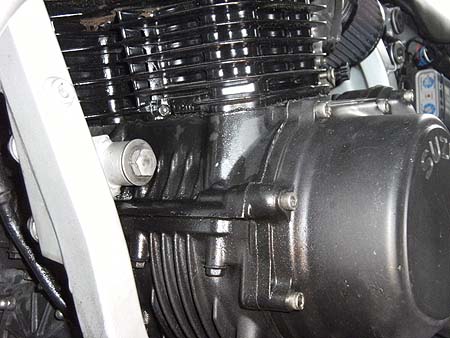
fitting the coils proved rather difficult because these are physically biggers than the originals.. also the tubes I welded in to brace the frame limited the available space further.. nothing to do but make some brackets to mounts the coils underneath the frame rails..
with these alterations the engine did run better but still far from smooth..
bad compression of the no.2 cylinder only higlighted the poor ignition issue but it was clear also the mechanical side needed to be dealt with.. had been trying to ignore the occasional misfire/kickback the engine suffered since I got it but also the growing oil consumption underlined the need to have the block and pistons replaced..
of course this was an opportunity to step the capacity up a notch to 1327cc.. I had been collecting parts and bits for a while snapping up deals as they came along as the budget was rather limited..
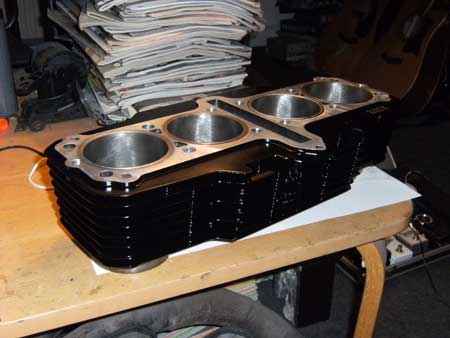
so I set to work cleaning and repainting the resleeved block I found cheaply on ebay as soon as I did manage to find the matching pistons too.. next time I'll make sure to have the block glass bead blasted though.. doing a good job by hand took ages.. :-/
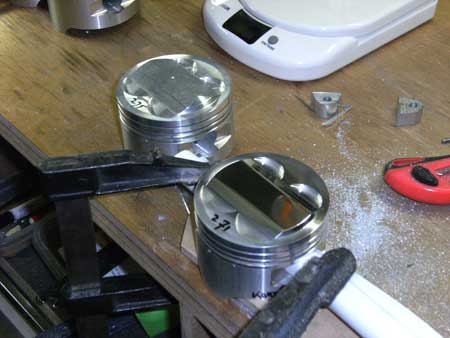
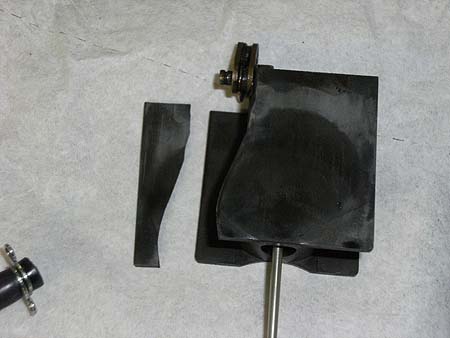
the 80mm MTC pistons were quite the bargain but were the high compression racing type (14:1).. so to make the engine run on regular pump fuel (and to have the starter actually turn the crank over) I needed to loose part of the raised dome in order to reduce the compression somewhere to the 12:1 region..
balancing the weight between the pistons proved a lot more difficult than grinding off the domes though.. one piston was quite a bit lighter than the others but got it the difference down to 1 gram in the end..
after all these preparations had been completed the time had come to actually take the head and block off the engine..

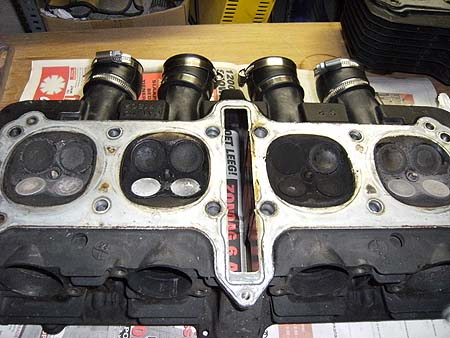
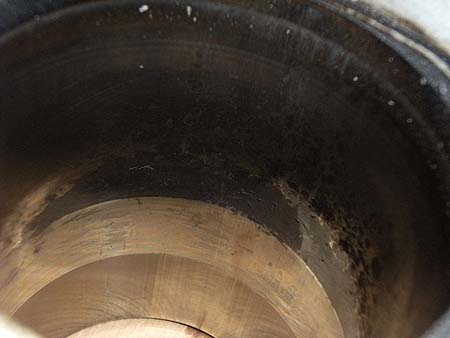
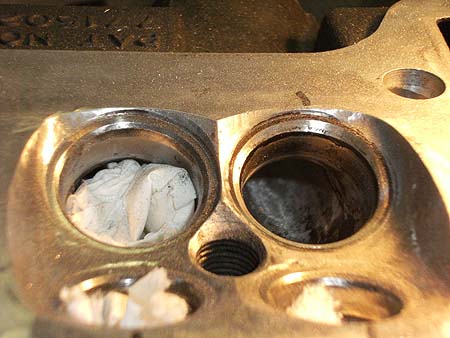
lots of carbon deposits on the no. 2 combustion chamber..
bad patch on the no. 2 cylinder wall pointing to the possible cause for the bad compression..
taking the valves out revealed the exhaust valves having quite a bit of play in the guides.. but as the budget didn't allow for new valves and guides and the work required I decided to just clean the parts up..
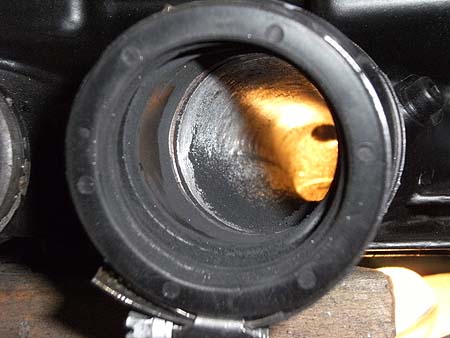
as the head was off anyway I had a look at the intake ports with my dremel.. the main aim being getting a smooth transition from the carb bore to the valves..
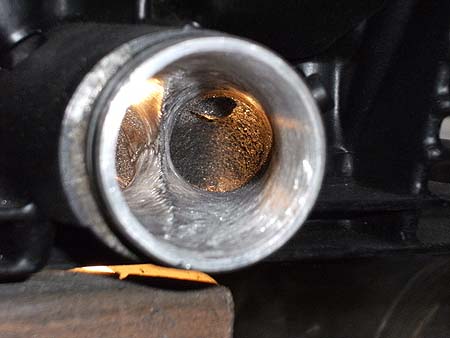
so this includes modifying the rubber manifolds too.. first match to port, then match to carb bore..
with these GSX rubbers there always is a big gap between the it and the port.. I made spacers (rings) from grounding wire to fill these gaps..
right.. no sense in postponing the BIG JOB any longer..
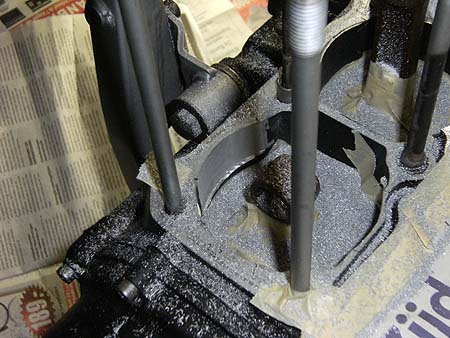
because of the bigger than stock sleeves the crankcase mouths needed to be opened up.. normally you'd want to machine the upper crankcase with the engine apart, so having just the separate part to work on.. but, as I'm quite lazy and time was pressing, I decided to take a shortcut by just taping up the bottom of the crankcase mouths leaving just enough material exposed to work on..
of course I don't recommend anyone doing it like this as the risk of ending up with a sump full of aluminum swarf is quite big.. getting the taping up slightly wrong might mean wrecked crank bearings.. so don't try this at home and all that..
so now you been told "how not to", have a look at "how to" anyway.. ;-)
oh.. spent a day getting the tape into place.. degreasing the area improved the stickiness of the tape a lot btw..

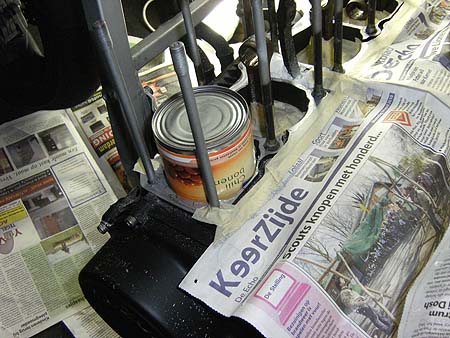
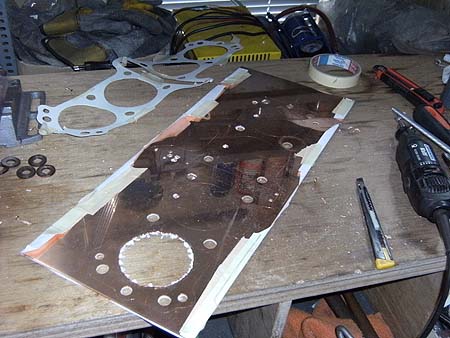
after having marked the parts that needed grinding (made a paper template) I started dremeling away..
used a specially calibrated gauge to determine the accuracy of the performed grinding job..
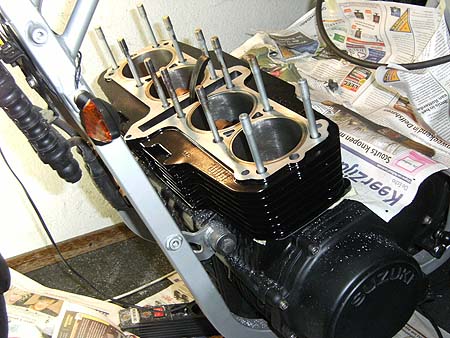
and after lots of work the block did fit onto the crankcase eventually..
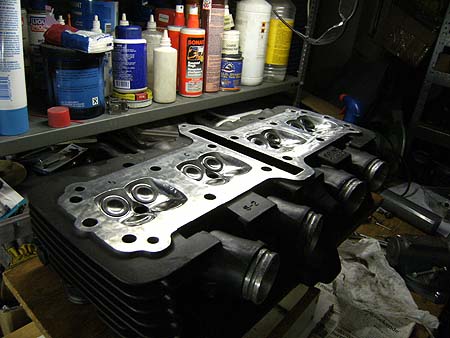
up to now I had only cleaned up the combustion chambers a bit but hadn't really addressed the condition of the valve seats..
to my horror some seats were pitted and the one (again on cyl. no. 2) was pretty bad.. bad enough to have it replaced but both because of the cost envolving having it professionally done and the time this would take I decided to have a go at it myself.. (again a "not recommended at home action".. no really, just because I'm willing to take these risks this doesn't mean it's a sound way to fix your engine..)
anyway.. the plan was to remove the pitted material so effectively deepen the valve seat.. of course this results in a slightly bigger combustion chamber and thus a slightly less compression on this cylinder alone.. but as the compression was going to be pretty high anyway I reckoned I'd be well within the ballpark.. so to speak..
right.. to retain the 3-angle valve seat I first worked on the 45 deg. bit deepening it as far as was needed.. on the pic I already ground away quite a bit but some of the pitting is still visible..
I used the valve itself as a guide to get the 45 deg. seat perfectly round again (used crayon on the valve head edge to mark the high spots, used marker pen on the seat as a finer tell-tale after that, finished off using sanding paper strips glued to the valve and finally a traditional valve grinding job concluded it all)
after getting this 45 deg. angle done grinding the shallower and steeper sections above and beneath it was relatively easy.. with these the width and position of the 45 deg. seat were established.. accuracy of the actual angles was not nearly as important as with the 45 deg. seat itself..
finally ended up with this.. not perfect by far but it has proven to be effective (compression is up, the misfiring/kickback has stopped)

so.. with this major hurdle behind me all the cleaned up valves could be placed back in the head again..
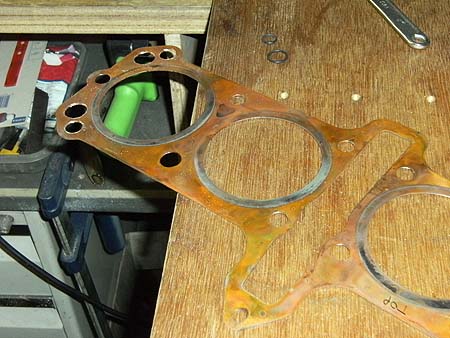
time to have a look at the gaskets.. because of the piano-wired sleeves a copper head gasket was needed (the groove cut into the top of the sleeve holds a steel wire that will cut into the softish copper gasket ensuring a solid seal of the combustion chamber)..
luckily I still had an old one still suiteable for reuse..
apart from enlarging the holes for the bigger bores I also enlarged the holes at the oilways to hold extra O-rings.. the plan was these rings would ensure an oiltight seal but later on I discovered the O-rings would not stay put and actually blocked up the oilway! so bad idea.. silicone gasket alone proved more than sufficient to seal these oilways to the head..
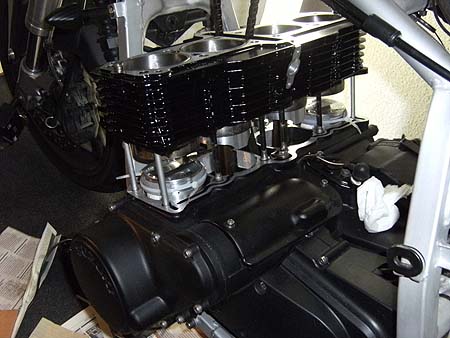
with all bits ready and the pistons connected to the rods now the block could be installed onto the engine..
oh.. have a look at my home made piston ring clamps.. they're sections of pvc pipe with a 45 deg. bevelled top edge to improve the transition into the sleeve.. tie-wraps are used to contract the clamps and rings..
torqueing the head nuts down.. I use quite a high setting.. the stock studs seem to cope with this pretty well.. the copper washers tend to flatten slightly and actually lock themselves onto the threads of the studs.. (or perhaps I shouldn't have reused the old ones so often..)
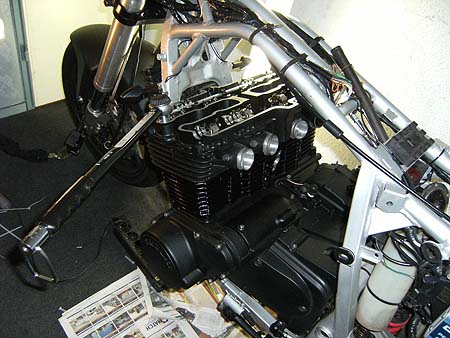
when the engine was ready to be fired up for the first time one of many setbacks revealed itself.. one of the slides of the RS36 carbs turned out to be broken.. the throttle did feel suspiciously heavy before.. :-|
so off with the flatslides and on went an old set of BST38 CV carbs..
really started to appreciate the feel of the flatslides but as separate slides are hard to get and this set of RSs is actually pretty worn out I decided to make do with the CVs for now..
after dealing with some wiring gremlins I did manage to start the engine in the end and took the EFE for its maiden trip..
with its belly topped up with mineral oil to help the running in process of the rings the EFE felt great with its enlarged lungs.. surprisingly the CVs didn't seem to need much adjusting as it felt great on the throttle..
sadly the joys of the rejuvinated engine were shortlived when the base gasket proved unable to keep the oil inside.. exactly at the spot where a repair had been made (crack running along cylinder no. 1) oil leaking out..
so.. things had to come apart again.. on inspection the mating surface of the block had a big dip in it at the point of the repair.. it seems the sleeve was installed with such force it not only cracked the block but also distorted the surface.. with epoxy and lots of sanding I tried filling the dip..
along with this repair I found the "clever" O-ring setup in the head gasket had fallen through.. so had to make another gasket from scratch to replace it.. also used a new stock base gasket this time.. which proved a successful move.. ;-)
when it all seemed to work in the end it turned out the starter wasn't coping with the bigger load it to turn over.. cold starts were just manageable but on hot starts only a "clunk" could be heard..
more about this next bit of tinkering soon..
..go to the next page for the next step in the evolution of the EFE-project..
..go back a page for the story leading up to this big bore install on the EFE..
so.. despite not having updated the GSX1100.com-site for nearly a year I have actually been quite busy working on the EFE..
it all started when I first took the bike out again at the beginning of the year and found it was running pretty bad.. cylinder no.2 didn't seem very eager to play along with the others at lower revs.. a wet plug pointed my suspicions to a faulty ignition so I decided to try some different coils and fitted the gray Dyna coils I had on the shelf for use on the GSX1100-project.. I also fitted the Dyna2000 of my GSX1100 when a spark test shpwed things still were not fixed with the coils alone.. Taylor Spiro leads completed this end (regular copper core leads not recommended with Dyna2000 ignition systems)
fitting the coils proved rather difficult because these are physically biggers than the originals.. also the tubes I welded in to brace the frame limited the available space further.. nothing to do but make some brackets to mounts the coils underneath the frame rails..
with these alterations the engine did run better but still far from smooth..
bad compression of the no.2 cylinder only higlighted the poor ignition issue but it was clear also the mechanical side needed to be dealt with.. had been trying to ignore the occasional misfire/kickback the engine suffered since I got it but also the growing oil consumption underlined the need to have the block and pistons replaced..
of course this was an opportunity to step the capacity up a notch to 1327cc.. I had been collecting parts and bits for a while snapping up deals as they came along as the budget was rather limited..
so I set to work cleaning and repainting the resleeved block I found cheaply on ebay as soon as I did manage to find the matching pistons too.. next time I'll make sure to have the block glass bead blasted though.. doing a good job by hand took ages.. :-/
the 80mm MTC pistons were quite the bargain but were the high compression racing type (14:1).. so to make the engine run on regular pump fuel (and to have the starter actually turn the crank over) I needed to loose part of the raised dome in order to reduce the compression somewhere to the 12:1 region..
balancing the weight between the pistons proved a lot more difficult than grinding off the domes though.. one piston was quite a bit lighter than the others but got it the difference down to 1 gram in the end..
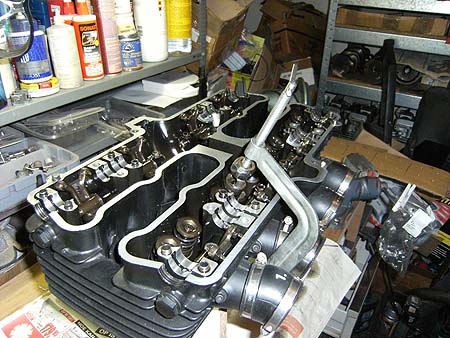
after all these preparations had been completed the time had come to actually take the head and block off the engine..
lots of carbon deposits on the no. 2 combustion chamber..
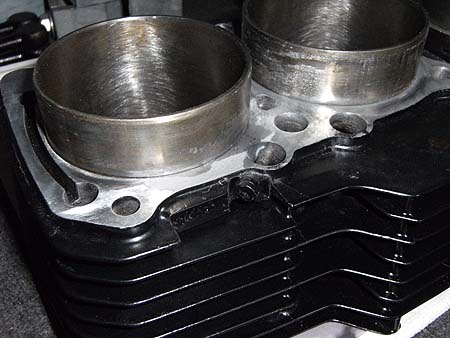
bad patch on the no. 2 cylinder wall pointing to the possible cause for the bad compression..
taking the valves out revealed the exhaust valves having quite a bit of play in the guides.. but as the budget didn't allow for new valves and guides and the work required I decided to just clean the parts up..
as the head was off anyway I had a look at the intake ports with my dremel.. the main aim being getting a smooth transition from the carb bore to the valves..
so this includes modifying the rubber manifolds too.. first match to port, then match to carb bore..
with these GSX rubbers there always is a big gap between the it and the port.. I made spacers (rings) from grounding wire to fill these gaps..
right.. no sense in postponing the BIG JOB any longer..
because of the bigger than stock sleeves the crankcase mouths needed to be opened up.. normally you'd want to machine the upper crankcase with the engine apart, so having just the separate part to work on.. but, as I'm quite lazy and time was pressing, I decided to take a shortcut by just taping up the bottom of the crankcase mouths leaving just enough material exposed to work on..
of course I don't recommend anyone doing it like this as the risk of ending up with a sump full of aluminum swarf is quite big.. getting the taping up slightly wrong might mean wrecked crank bearings.. so don't try this at home and all that..
so now you been told "how not to", have a look at "how to" anyway.. ;-)
oh.. spent a day getting the tape into place.. degreasing the area improved the stickiness of the tape a lot btw..
after having marked the parts that needed grinding (made a paper template) I started dremeling away..
used a specially calibrated gauge to determine the accuracy of the performed grinding job..
and after lots of work the block did fit onto the crankcase eventually..
up to now I had only cleaned up the combustion chambers a bit but hadn't really addressed the condition of the valve seats..
to my horror some seats were pitted and the one (again on cyl. no. 2) was pretty bad.. bad enough to have it replaced but both because of the cost envolving having it professionally done and the time this would take I decided to have a go at it myself.. (again a "not recommended at home action".. no really, just because I'm willing to take these risks this doesn't mean it's a sound way to fix your engine..)
anyway.. the plan was to remove the pitted material so effectively deepen the valve seat.. of course this results in a slightly bigger combustion chamber and thus a slightly less compression on this cylinder alone.. but as the compression was going to be pretty high anyway I reckoned I'd be well within the ballpark.. so to speak..
right.. to retain the 3-angle valve seat I first worked on the 45 deg. bit deepening it as far as was needed.. on the pic I already ground away quite a bit but some of the pitting is still visible..
I used the valve itself as a guide to get the 45 deg. seat perfectly round again (used crayon on the valve head edge to mark the high spots, used marker pen on the seat as a finer tell-tale after that, finished off using sanding paper strips glued to the valve and finally a traditional valve grinding job concluded it all)
after getting this 45 deg. angle done grinding the shallower and steeper sections above and beneath it was relatively easy.. with these the width and position of the 45 deg. seat were established.. accuracy of the actual angles was not nearly as important as with the 45 deg. seat itself..
finally ended up with this.. not perfect by far but it has proven to be effective (compression is up, the misfiring/kickback has stopped)
so.. with this major hurdle behind me all the cleaned up valves could be placed back in the head again..
time to have a look at the gaskets.. because of the piano-wired sleeves a copper head gasket was needed (the groove cut into the top of the sleeve holds a steel wire that will cut into the softish copper gasket ensuring a solid seal of the combustion chamber)..
luckily I still had an old one still suiteable for reuse..
apart from enlarging the holes for the bigger bores I also enlarged the holes at the oilways to hold extra O-rings.. the plan was these rings would ensure an oiltight seal but later on I discovered the O-rings would not stay put and actually blocked up the oilway! so bad idea.. silicone gasket alone proved more than sufficient to seal these oilways to the head..
with all bits ready and the pistons connected to the rods now the block could be installed onto the engine..
oh.. have a look at my home made piston ring clamps.. they're sections of pvc pipe with a 45 deg. bevelled top edge to improve the transition into the sleeve.. tie-wraps are used to contract the clamps and rings..
torqueing the head nuts down.. I use quite a high setting.. the stock studs seem to cope with this pretty well.. the copper washers tend to flatten slightly and actually lock themselves onto the threads of the studs.. (or perhaps I shouldn't have reused the old ones so often..)
when the engine was ready to be fired up for the first time one of many setbacks revealed itself.. one of the slides of the RS36 carbs turned out to be broken.. the throttle did feel suspiciously heavy before.. :-|
so off with the flatslides and on went an old set of BST38 CV carbs..
really started to appreciate the feel of the flatslides but as separate slides are hard to get and this set of RSs is actually pretty worn out I decided to make do with the CVs for now..
after dealing with some wiring gremlins I did manage to start the engine in the end and took the EFE for its maiden trip..
with its belly topped up with mineral oil to help the running in process of the rings the EFE felt great with its enlarged lungs.. surprisingly the CVs didn't seem to need much adjusting as it felt great on the throttle..
sadly the joys of the rejuvinated engine were shortlived when the base gasket proved unable to keep the oil inside.. exactly at the spot where a repair had been made (crack running along cylinder no. 1) oil leaking out..
so.. things had to come apart again.. on inspection the mating surface of the block had a big dip in it at the point of the repair.. it seems the sleeve was installed with such force it not only cracked the block but also distorted the surface.. with epoxy and lots of sanding I tried filling the dip..
along with this repair I found the "clever" O-ring setup in the head gasket had fallen through.. so had to make another gasket from scratch to replace it.. also used a new stock base gasket this time.. which proved a successful move.. ;-)
when it all seemed to work in the end it turned out the starter wasn't coping with the bigger load it to turn over.. cold starts were just manageable but on hot starts only a "clunk" could be heard..
more about this next bit of tinkering soon..
..go to the next page for the next step in the evolution of the EFE-project..
..go back a page for the story leading up to this big bore install on the EFE..
Copyright ©2026 Arnout's motorbike www.GSX1100.com