Offset sprocket
In order to make room for fitting a wider rear wheel and tyre the drive chain has to be moved to the outside to keep the chain inline with the rear sprocket (also have the sprocket carrier milled down by such an amount that the chain will just clear the tyre).
To keep the chain parallel to the centre line of the bike the front sprocket has to be moved outward aswell. If it only has to be moved by a small distance (fitting a 140/150 tyre) a spacer or a stack of washers can be used to bring it out untill it is stil located on the splines of the drive shaft. (Mind the nut that wil now only go on as far as the threads allow.. the locking part of the nut can no longer be used so you have to make absolutely sure you fit it with a mint locking tab!)
When fitting an even wider tyre necessitating the chain to be moved outward more an offset sprocket must be used to extend the teeth beyond the splines of the drive shaft. Although several manufacturers offer offset sprockets over the internet finding a suitable offset sprocket can be an expensive affair.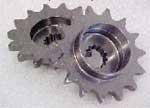
www.pmfronline.com
www.debben.co.uk
www.bikers-trend-depot.de
Most of these are quite expensive so trying to make your own becomes a viable option.
Below the sprocket I made myself for this reason using two regular sprockets.
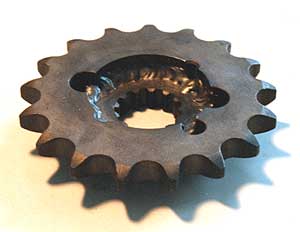
First I took the center of an old sprocket (which I had lying around) and bolted that onto a spare drive shaft alongside a new sprocket..
Had them welded together lined up exactly spot on because of the shaft which I removed to have the center of the new sprocket milled out..
After that I went back to the welder one last time to also have the inside welded aswell..
When making your own offset sprocket take care to keep the flat inside surface wide enough for the nut to be fitted correctly!
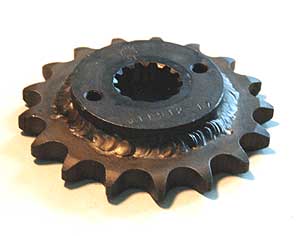
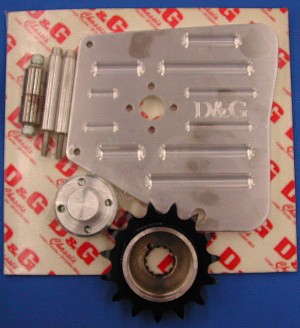
Not long after having fitted the home made one purely by chance I came across another manufacturer offering affordable offset sprockets in a number of sizes:
 xam-japan.co.jp update: site has been changed, contact them by email for orders
Immediately I ordered myself a small batch and they're looking good! (extra spacer included).
Offsetting the chain and sprockets is limited to a maximum because of the frame downtube which the chain has to clear. To be able to fit the biggest tyre possible (180.. some reports of a 190 being fitted!) extra space can be found in reducing the size of the chain.
As standard the GSX1100's were fitted with a 630 pitch chain but by now technology has moved on making it possible to choose a 530 (or even 525 or 520) of sufficient strength which can be chosen in narrower sizes providing some extra mm to play with.
With stock power it is not a problem finding a 525 or 520 chain that's up tp the task but finding an offset sprocket to match will prove impossible. As a solution I suppose a 530 offset sprocket could be milled down (525: 1.59mm, 520: 3.18mm) to suit.
Another option to get a narrow but strong chain is to choose a non O- or X-ring chain which are about 2mm less in width but of course this will mean a lot more work keeping it greased up. (Some manufacturers list a "wear life index" of a quarter of that of the O/X-ring type..)
Some figures taken from the RK catalog:

Note that 630 and 530 chains only differ in pitch size (15.875mm - 19.05mm) and the inner width is actually the same. So when comparing chains of similar strength (equal plate thickness) they have about the same outer width.
An advantage of maintaining the 630 chain is the possibility of getting cheap sprockets if you would only require a small offset. The '83-'85 Kawasaki GPZ750 (ZX750A1/A2/A3) came factory fitted with a 15T 6mm offset sprocket (partno.13144-1084) which will fit the GS(X)1100 nicely because the old Kawas share the same outputshaft spline as the GSs and GSXs (21.6 ID / 25.0 OD).
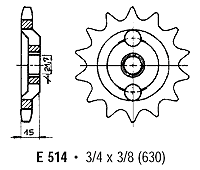
This sprocket is only available with 15T so if you'd like to have the option of fitting another no. of teeth you'd probably better switch to 530. 630 chains are heavier (which costs power) and personally I have had only bad experiences with them in the form of excessive wear (I was always adjusting the thing). This disappeared completely after fitting a 530 chain and sprockets.
So forget about 630 unless you're going for the cheap kawa sprockets.
Another matter concerns what offset you'll need for the rear tyre you're going to fit. As spacers or washers will allow small adjustments in positioning the sprocket on the shaft a range of offsets can be had with the generally offered offset sizes.
- 9mm offset will suit a rear tyre of up to about 160mm wide (170 max.)
- 14mm offset will be required for 180 wide and over.
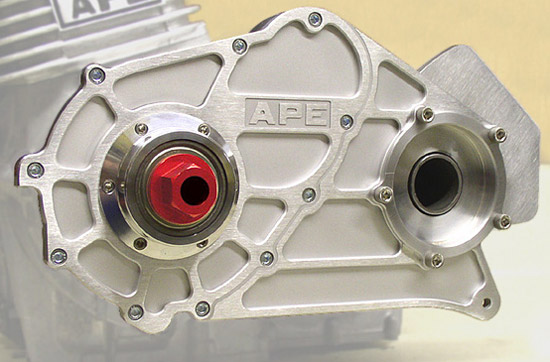
Beware of the fact that the more you place the sprocket (and chain) outwards the more stress on the shaft is created. With a big offset (14mm / 180 tyre) and stock or slightly increased power I reckon this will only just do. If your engine makes more power (120+) it is wise to also fit an outer bearing support for the output shaft.
Such a support kit consists of a plate to replace the sprocket cover and has a big bearing to hold the nose of a offset sprocket specially made for this kit.
Finally a word on the stock nut which should only be used with the locking tab. It will loosen if you don't and get off the shaft wrecking the threads on it within only a few seconds!
Another option (and a better idea I think) is using an extra (flat) nut on top to lock the main one. The stock nut will have to be ground down to remove the locking bit so the extra nut will have a good contact surface to it.
In order to make room for fitting a wider rear wheel and tyre the drive chain has to be moved to the outside to keep the chain inline with the rear sprocket (also have the sprocket carrier milled down by such an amount that the chain will just clear the tyre).
To keep the chain parallel to the centre line of the bike the front sprocket has to be moved outward aswell. If it only has to be moved by a small distance (fitting a 140/150 tyre) a spacer or a stack of washers can be used to bring it out untill it is stil located on the splines of the drive shaft. (Mind the nut that wil now only go on as far as the threads allow.. the locking part of the nut can no longer be used so you have to make absolutely sure you fit it with a mint locking tab!)
When fitting an even wider tyre necessitating the chain to be moved outward more an offset sprocket must be used to extend the teeth beyond the splines of the drive shaft. Although several manufacturers offer offset sprockets over the internet finding a suitable offset sprocket can be an expensive affair.
www.pmfronline.com
www.debben.co.uk
www.bikers-trend-depot.de
Most of these are quite expensive so trying to make your own becomes a viable option.
Below the sprocket I made myself for this reason using two regular sprockets.
First I took the center of an old sprocket (which I had lying around) and bolted that onto a spare drive shaft alongside a new sprocket..
Had them welded together lined up exactly spot on because of the shaft which I removed to have the center of the new sprocket milled out..
After that I went back to the welder one last time to also have the inside welded aswell..
When making your own offset sprocket take care to keep the flat inside surface wide enough for the nut to be fitted correctly!
Not long after having fitted the home made one purely by chance I came across another manufacturer offering affordable offset sprockets in a number of sizes:
xam-japan.co.jp update: site has been changed, contact them by email for orders
Immediately I ordered myself a small batch and they're looking good! (extra spacer included).
Offsetting the chain and sprockets is limited to a maximum because of the frame downtube which the chain has to clear. To be able to fit the biggest tyre possible (180.. some reports of a 190 being fitted!) extra space can be found in reducing the size of the chain.
As standard the GSX1100's were fitted with a 630 pitch chain but by now technology has moved on making it possible to choose a 530 (or even 525 or 520) of sufficient strength which can be chosen in narrower sizes providing some extra mm to play with.
With stock power it is not a problem finding a 525 or 520 chain that's up tp the task but finding an offset sprocket to match will prove impossible. As a solution I suppose a 530 offset sprocket could be milled down (525: 1.59mm, 520: 3.18mm) to suit.
Another option to get a narrow but strong chain is to choose a non O- or X-ring chain which are about 2mm less in width but of course this will mean a lot more work keeping it greased up. (Some manufacturers list a "wear life index" of a quarter of that of the O/X-ring type..)
Some figures taken from the RK catalog:
| RK chain | P | L | W | T1 | T2 | ||||
|---|---|---|---|---|---|---|---|---|---|
| type/size chart | pitch | pin length | roller width | plate thickness | tensile strength | weight 100 links | wear life index | max cc | |
| mm - inch | mm | mm - inch | mm | mm | lbs | lbs | |||
| 520SHO | 15.875 - 5/8" | 19.9 | 6.35 - 2/8" | 2.2 | 2.2 | 7,850 | 3.68 | 800 | 750/600 |
| 525ROZ | | | 22.85 | 7.95 - 5/16" | 2.4 | 2.3 | 8,200 | 4.22 | 800 | 1000/750 |
| 530HFO | | | 24.9 | 9.53 - 3/8" | 2.4 | 2.3 | 9,000 | 4.45 | 1,000 | 750/600 |
| 530LFO | | | 25.4 | | | 2.4 | 2.6 | 10,000 | 5 | 1,000 | 1100/900 |
| 530LO | | | 25.8 | | | 2.6 | 2.6 | 11,200 | 5.3 | 1,000 | 1200/NA |
| 530DR | 15.875 - 5/8" | 23.25 | | | 2.4 | 2.6 | 10,375 | 5 | 250 | 1500 drag |
| 630SO | 19.05 - 3/4" | 26.65 | | | 2.4 | 2.4 | 11,100 | 6.48 | 800 | 1000/NA |
| 630GSV | 19.05 - 3/4" | 25 | 9.53 - 3/8" | 2.4 | 2.4 | 11,300 | 6.48 | 1,000 | 1200/NA |
Note that 630 and 530 chains only differ in pitch size (15.875mm - 19.05mm) and the inner width is actually the same. So when comparing chains of similar strength (equal plate thickness) they have about the same outer width.
An advantage of maintaining the 630 chain is the possibility of getting cheap sprockets if you would only require a small offset. The '83-'85 Kawasaki GPZ750 (ZX750A1/A2/A3) came factory fitted with a 15T 6mm offset sprocket (partno.13144-1084) which will fit the GS(X)1100 nicely because the old Kawas share the same outputshaft spline as the GSs and GSXs (21.6 ID / 25.0 OD).
This sprocket is only available with 15T so if you'd like to have the option of fitting another no. of teeth you'd probably better switch to 530. 630 chains are heavier (which costs power) and personally I have had only bad experiences with them in the form of excessive wear (I was always adjusting the thing). This disappeared completely after fitting a 530 chain and sprockets.
So forget about 630 unless you're going for the cheap kawa sprockets.
Another matter concerns what offset you'll need for the rear tyre you're going to fit. As spacers or washers will allow small adjustments in positioning the sprocket on the shaft a range of offsets can be had with the generally offered offset sizes.
- 9mm offset will suit a rear tyre of up to about 160mm wide (170 max.)
- 14mm offset will be required for 180 wide and over.
Beware of the fact that the more you place the sprocket (and chain) outwards the more stress on the shaft is created. With a big offset (14mm / 180 tyre) and stock or slightly increased power I reckon this will only just do. If your engine makes more power (120+) it is wise to also fit an outer bearing support for the output shaft.
Such a support kit consists of a plate to replace the sprocket cover and has a big bearing to hold the nose of a offset sprocket specially made for this kit.
Finally a word on the stock nut which should only be used with the locking tab. It will loosen if you don't and get off the shaft wrecking the threads on it within only a few seconds!
Another option (and a better idea I think) is using an extra (flat) nut on top to lock the main one. The stock nut will have to be ground down to remove the locking bit so the extra nut will have a good contact surface to it.
Copyright ©2026 Arnout's motorbike www.GSX1100.com